SINGAPORE SKYLINE PANORAMA'S
- Mark Stevens

- Mar 28, 2022
- 6 min read
Updated: Oct 1, 2024
DISCOVER SINGAPORE'S HIDDEN GEMS
You will discover more of the Lion City if you start-out with a good plan. At Singapore Street Shots our Blogs will help you discover Singapore’s hidden gems. We'll give you Information & tips for creating stunning photos and exploring Singapore's neighborhoods.

The 3rd in a seven blog series of “Singapore in Pictures-Telling your Singapore story with photos”.
TELLING YOUR SINGAPORE STORY WITH PHOTOS
You’ve explored most of Singapore, created incredible memories and tonnes stunning photos in Chinatown, little India and more. All your family & friends are loving the photos you've posted, they can’t believe you can take such beautiful pictures…
So now, before you board that ship or plane there are still a couple of must have photos your gonna want before you say good bye to Singapore. These are some stunning Panorama's of Singapore’s beautiful Marina Bay Skyline, it's almost as if the Singapore Skyline was designed for photos and panorama's in particular.
In one glance you can pick out at least four great locations for beautiful pano's that have many of the elements needed to make a world class photograph. For sure this city is made for Panorama's, in every direction you look you see Leading lines, incredible foreground, multi-colored Skyscrapers and much more. Golden hour, Sunset, Evening and Blue hour... Be sure and capture them all.
Today we can create great panoramas with either a DSLR camera or a smartphone, however I think your best pano's are created with a DSLR camera.
In this blog I'll talk about some techniques on how to create stunning panorama's with both a Smartphone and a DSLR camera.
Singapore Street Shots Skyline Panorama Sessions
Join us nightly at the Marina and let us help you create stunning Panorama's of the beautiful Singapore Skyline. We have all the gear and knowledge, all you need is your camera or smartphone.
Book Now at www.singaporestreetshots.com
THE 3 P’s OF PHOTOGRAPHY
Before we get started let’s talk a bit about the 3 P’s of photography, Planning, Preparation and Patience. I can’t overstate how important each of these aspects are to a successful day of photographing.
Planning: Plan out everything down to the smallest detail, equipment & gear, time of day or night, sunrise or sunset directions,
Preparation: Be sure you have everything you need to successfully complete your photos, Lenses, memory cards, tools for adjusting & setting up your gear, spare batteries and lens cleaning gear… Know your camera and how it works inside & out, learn the menu, settings and functions (You won’t have time to look into the manual when it’s crunch time on your photo shoot). Also it’s a good idea to practice your pano photo sequence a few times the day before, it’ll help the shoot go much smoother with less frustration.
Patience: Don’t rush or you’ll make mistakes, take your time and enjoy your photography. Plus, always remember other people have the right to be doing their thing also. Don’t get frustrated with people getting in the way.
So let’s start with the Smartphone since it's the the one camera almost everyone has. Before we get into the technical stuff let's start by cleaning our smartphone lens.
BASIC EQUIPMENT
The Smartphone Set-up:
The iPhone is simple, just tap your camera icon and select PANO. You only have the option of continuously moving/rotating the camera from your selected starting point until your selected ending point. The software in the iPhone will put it all together into one big Panorama.
You can do this free handed, however it works out better if you use a small Tripod (level your tripod first), and a device like the Pivo Pod One - Smartphone Motion Tracker: that will smoothly rotate your smartphone while the pano is being created. Plus it can auto track you as you blog and help you make videos and more.
The DSLR Camera Set-up:
Basic equipment needed- Camera, Lens, Tripod, Leveling base, Panoramic Gimbal, Panoramic Indexing Rotator and some filters.
MY PANO SET-UP
Lenses: Mostly I use Prime lenses for Pano's. Nikon 50mm, 85mm or 105mm
Tripod 1: My carry everywhere tripod- Sirui AM-254+A-10R
Tripod 2: Carbon Fiber INNOREL RT90C Tripod.
Panoramic Indexing Rotator: Gemtune DH-55 Panoramic Ball Head Tripods Head with Indexing Rotator. This will make it much faster & easier to go through your Pano sequence.
Tripod leveling adapter: Neewer® Tripod Leveling Base.
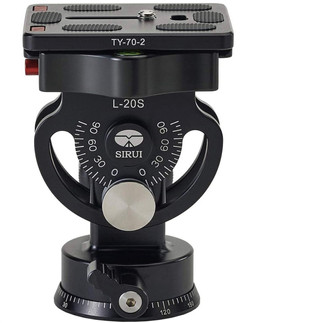
Sirui L Series L-20S 2-Way Levelling Tilt Head:- Great for doing Multi-level Pano's.
Nodal Slides: SUNWAYFOTO DMP-200R and Desmond 120mm- To achieve the Nodal point of my lenses.
Portable Stool: By Inspired Living. Its nice to have a place to sit down and think.
Magna Cart Personal 150 lb Capacity Aluminum Folding Hand Truck: All my gear goes on this portable tough hand truck. It has large wheels that can handle any cities streets, and folds up to go into a suitcase for air travel.
GETTING SET UP
This whole process will go a lot smoother and easier if you start with good sturdy gear, nothing worse than a flimsy tripod (You get what you pay for). I usually use prime lenses, 50mm, 85mm, 105mm as they deliver tac sharp images from edge to edge and I never have to worry about my focal length changing during my shooting process.
First step: Select a great location for your Pano and make sure you have solid ground for your tripod, no wooden platforms, boardwalks or bridges as you'll have vibration if people are constantly passing by. (This will cause your pano to be less than tac sharp).
Second step: Level the base of your tripod so your camera will remain level throughout the entire span of your Panorama.
Third step: Mount your Panoramic Indexing Rotator, I use an indexing rotator because it gives me consistency and speed during all the shots in the sequence of my pano. This is especially important for Golden hour & Sunset Panorama's as the light changes rapidly.
Forth step: Always shoot pano’s in full Manual mode, ISO at 100 and the sharpest aperture for your Lens. I shoot with the mirror up and a 2 second delay after the shutter button is pressed to eliminate camera shake.
READY FOR ACTION
First thing I do when I'm all set-up is a couple of practice Panos so I know everything works. Now just a short wait for the Golden hour to create the first of four pano's of the night, Golden hour, Sunset, Evening and Blue hour...
Closing Remarks

Don't forget to LIKE & FOLLOW our Facebook page and post some of your own stunning Skyline Panoramic photos, along with a short story about your experience on our Singapore Street Shots Facebook Page.
Cheers,
Mark Stevens & Ilonka Guenther
Business Owners, Photographers & Travelers
SEE ALL OUR BLOGS
At Singapore Street Shots our Blogs are meant to give you tips & advice for exploring Singapore and creating stunning photos. You will discover and photograph more if you do some research and create a good plan.
Singapore in Pictures - Telling your Singapore story with photos.
(A Seven blog series)
SINGAPORE SHOPHOUSES - Telling your Singapore story with photos.
Singapore Skyline Panorama's - Photograph Singapore's world class Skyline
Singapore's Chinatown - Kreta Ayer - Telok Ayer - Tanjong Pagar - Bukit Pasoh
Singapore's Little India - Culture & Colour
Kampong Glam - Singapore's Arab Quarter
Hawkers & Markets - Flavor the Moment
Singapore - Off the Beaten Path - Discover the Singapore most tourist never see
DRESSING FOR SECCESS -Look good and Feel good on your day-trip
Tips for Travelers: Capture your Memories with Pictures
Singapore's MRT & BUS System-Saving you Time and Money using : Utilizing Goggle Maps with the MRT
A Rainy Day Holiday in Singapore - Things to do in Singapore when it's rainy weather
MASTER YOUR CAMERA - Use your camera like a pro
EASY EDITING - Make all your photos pop
Great Singapore Shophouse locations - The best locations for photographing Singapore Shophouses
FUTURE BLOGS
(Coming soon)
A Five Blog series
"Discovering Singapores Parks"
Parks:
1st Series: East and West coast parks:
2nd Series: Singapore Botanical Gardens:
3rd Series: Kent Ridge & Hort parks:
4th Series: Fort Canning park:
5th Series: Lakeside Gardens
A Three Blog series
"Photographing Singapores Natural Beauty"
Nature Reserves:
1st Series: Bukit Timah Nature Reserve
2nd Series: MacRitchie Nature Reserve
3rd Series: Singapore Zoo and Singapore Bird Park
A Six Blog series
"Photographing Singapores Islands"
Singapore’s islands:
1st Series: Pulau Ubin
2nd Series: Coney Island
3rd Series: Sentosa Island
4th Series: St. John Island
5th Series: Kusu Island
6th Series: Lazarus Island.


Comments